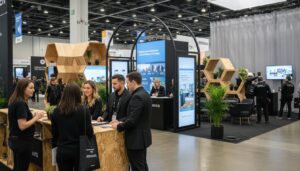
Does your trade show booth feel like it’s just… there? Let’s fix that. Your booth can be a powerful tool for real goals, launching products, hosting meetings, and capturing leads.
Modern exhibiting isn’t about size. It’s about strategy. Start with your objectives: What do you want to achieve on the show floor?
In this guide, we’ll focus on goals, not just frames and graphics. You’ll see how a flexible display can adapt for product launches, live demos, small spaces, and more, so your booth doesn’t just show up, it shows off. Ready? Let’s dive in.
Goal 1: Launch a Product with Unforgettable Buzz
Launching a new product is your one shot to make a massive first impression. You need to stop people in their tracks, clearly communicate what makes your new thing special, and create a memorable experience. A generic booth with a “New Product!” sign won’t cut it. You need a stage, and your booth is that stage.
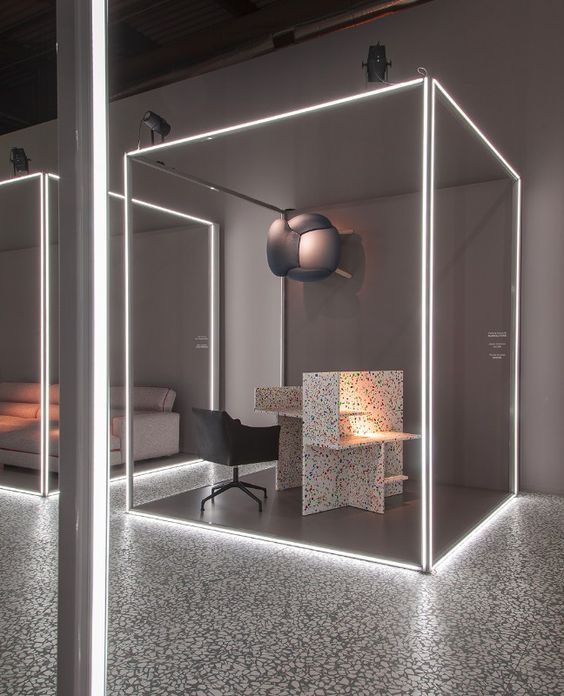
Create a “Wow” Moment with Light and Media
The single best way to draw a crowd is with light. An entire wall of your booth can be transformed into a brilliant, edge-to-edge backlit graphic. Imagine your new product, larger than life and glowing from across the aisle. This is how you pull people in from 50 feet away. It creates an instant sense of premium quality and importance.
Next, add motion. Integrate large monitor mounts directly into your booth’s framework. You can run a high-energy launch video on a loop or showcase a 3D animation of your product in action. Combining a stunning backlit wall with a dynamic video screen creates a can’t-miss focal point that screams “Something important is happening here.”
Design a Hands-On Experience
People want to touch and try what’s new. Don’t hide your product behind a counter. Design your space to encourage interaction.
- Demo Stations: Create dedicated pods or counters where attendees can get a hands-on demonstration. Include custom-fit product shelving to display different models or accessories.
- Interactive Touchscreens: Use a touchscreen to let visitors explore features, watch tutorials, or configure the product themselves. It’s a powerful way to engage them while your team is busy with other prospects.
- A Clear Path: Design the flow of your booth to guide visitors directly to the product. Use flooring to create a visual path from the aisle to the main event.
A successful launch booth makes the product the hero. With a flexible exhibit display, you can build the perfect stage to let it shine.
Goal 2: Showcase Your Product with Live Demos
Telling people your product is great is one thing. Showing them is a game-changer. Live demonstrations build trust and answer questions in real-time, turning curious lookers into confident buyers. But a great demo needs more than just a talented presenter; it needs a space designed for it.
Building the Perfect Demo Zone
Your demo area shouldn’t be an afterthought. It needs to be an inviting, functional space that supports both the presenter and the audience.
- The Right Counter: A simple folding table feels cheap. Use a sturdy, branded counter that’s the right height for your product. Integrate lockable storage below to keep extra equipment, samples, and cleaning supplies hidden but handy.
- Show, Don’t Just Tell: Mount a monitor right above your demo counter. You can connect a camera to it to give the crowd a close-up view of intricate details they might otherwise miss. This is perfect for small electronics, detailed software, or complex machinery.
- Gather a Crowd: Make sure there’s enough open space for people to gather and watch comfortably. Consider using angled walls to create a natural “nook” that focuses attention inward. This simple trick makes your booth feel more like a mini-theater and less like an open corridor.
Keeping Your Audience Engaged
Once you have their attention, you want to keep it. The longer people stay, the more they learn and the more invested they become. Small comforts make a huge difference. If your demos are longer than a few minutes, having a couple of high-top stools can be a welcome touch. You can even add a small charging station to a nearby counter. While visitors are powering up their phones, they are a captive audience for your presentation.
The best demo-focused modular stands are all about creating an engaging and comfortable environment where your product can be the star.
Goal 3: Build Relationships with Quality Meetings
Sometimes, the most important goal at a trade show isn’t about scanning hundreds of badges. It’s about having a few high-quality conversations with key clients or partners. To do that, you need a space that feels professional, private, and comfortable a calm oasis in the middle of a chaotic convention hall.
Creating Your On-Floor Office
Yelling over the noise of the crowd is not a great way to close a deal. A smart booth layout can create the privacy you need.
- Semi-Private Meeting Nooks: You don’t need to build a stuffy, closed-off room. Use tall panels or frosted plexiglass to create a semi-private corner within your booth. A 10×20 layout is perfect for this, allowing one half to be open and inviting while the other half serves as a dedicated meeting zone.
- Comfort is Key: Replace hard trade show chairs with comfortable seating. A small table with a couple of cushioned chairs instantly signals that this is a place for a real conversation. This small investment in comfort tells your guests that you value their time.
- Control the Environment: Use sound-dampening fabric panels to help absorb some of the ambient noise from the show floor. Add a hanging sign high above your booth to act as a “roof,” which can also help to make the space feel more enclosed and intimate.
The Hybrid Approach for Big Meetings
What if you only need a large meeting room for one specific show? This is where a hybrid rental approach shines. You can own a core 10×10 or 10×20 frame that you use for most events. Then, for that one big show, you can rent additional components to build out a larger 20×20 island exhibit with a dedicated, private conference room right in the center. It’s the ultimate in flexibility, giving you the perfect tool for the job without the cost of owning a massive structure year-round.
Goal 4: Double Your Leads with Smart Booth Flow
Lead generation is often the #1 metric for trade show ROI. But capturing leads isn’t just about having a great pitch; it’s about designing a booth that makes the process seamless and natural. Your layout can either create bottlenecks that frustrate visitors or create a smooth-flowing path that encourages interaction and makes lead capture easy.
Designing for Engagement
The goal is to move people from the aisle into your space and toward an engagement point without making them feel trapped.
- The Open Concept: Avoid putting a table across the front of your booth. This creates a physical and psychological barrier. Instead, design an open layout with a clear, welcoming entry point. Use angled walls to guide traffic naturally into the center of your space.
- Strategically Placed Stations: Don’t clump everything together. Create a few different stations within your booth: a welcome counter near the front, a demo area further in, and maybe a seated area for longer chats. This disperses the crowd and allows your team to manage multiple conversations at once.
- The “Sticky” Factor: Adding a charging station or a simple game can dramatically increase dwell time. A visitor who stops to charge their phone for 10 minutes is 10 times more likely to engage with your team than someone just walking by. This is your chance to start a conversation and scan their badge. Studies have shown that booths with more engaging elements can lead captures double compared to static displays.
Portable systems make it easy to reconfigure your layout for every show, so you can test and refine your flow until you have a true lead-generating machine.
Goal 5: Tell Your Brand’s Story with Powerful Visuals
Your brand is more than a logo. It’s a story, a feeling, a promise. Your trade show booth is one of the most powerful physical representations of that story. The colors, materials, and graphics you choose all work together to communicate who you are before your team even says a word.
Graphics That Grab Attention
Your graphics are the single most important element for brand storytelling. With modular display systems, you have amazing options.
- Fabric Graphics: Say goodbye to heavy, easily-damaged panels. Modern booths use vibrant, dye-sublimated fabric graphics. These graphics are lightweight, machine washable, and stretch to create a smooth, seamless finish. You can cover an entire 10-foot or 20-foot wall with a single, stunning image.
- Go Big with Backlighting: As we mentioned for product launches, backlit graphics are a showstopper. Using them to showcase your brand’s key lifestyle image or a powerful tagline creates an emotional connection with attendees. It makes your brand look established, professional, and confident. Clients often report a 35% or more increase in foot traffic just by switching to backlit graphics.
- Consistency is Key: Your booth should feel like a natural extension of your website and marketing materials. Use the same fonts, colors, and imagery to create a cohesive brand experience. With fabric graphics, it’s easy and affordable to have different sets of graphics for different campaigns, ensuring your message is always on point.
Your trade show booth is a 3D billboard for your brand. Using bold, beautiful graphics and the power of light tells a story that resonates and sticks with people long after the show ends.
Goal 6: Make a Big Impact in a Small Space (10×10 & 10×20)
You don’t need a massive island booth to make a huge impact. With a smart design, a 10×10 or 10×20 inline booth can be one of the most effective and efficient spaces on the show floor. The key is to maximize every square inch and focus on one primary goal.
The Mighty 10×10 Booth
A 10×10 space is all about focus. Don’t try to do everything. Pick one goal and design for it.
- The Lead Capture Focus: Use a backwall with a bold backlit graphic and a single, stylish counter positioned at the front corner. This leaves the rest of the space open, inviting people in and giving your team room to talk. Add a monitor for a looping video, and you have a powerful, yet compact, lead-generating station.
- The Demo Focus: Push your counter to the back of the booth. This draws people all the way in for a hands-on demo. Use the back wall for shelving to display products and mount a TV to show close-ups.
The Versatile 10×20 Booth
A 10×20 booth gives you room to breathe and zone your space. You can effectively pursue two goals at once.
- Demo & Meet: Use one 10-foot section for a high-energy demo station with a monitor and counter. Use the other 10-foot section to create a semi-private meeting nook with comfortable seating. It’s the perfect balance of drawing a crowd and closing deals.
- Brand & Product Showcase: Use the entire 20-foot backwall for a massive, eye-catching graphic. In front of it, create two or three distinct product “pods” with small counters or shelving, allowing visitors to explore your product line at their own pace.
With tool-free modular stands, you can set up a stunning 10×20 booth in just a couple of hours, saving you a fortune on labor costs.
Goal 7: Growing Your Booth as Your Company Grows
One of the biggest advantages of a modular system is its ability to grow with you. You’re not locked into one size or configuration. Your initial investment can be the foundation for a much larger presence down the road.
From 10×10 to 10×20
Let’s say you start with a 10×10 booth. You buy a high-quality frame, a backlit graphic, and a counter. For the next year, you use this setup, and it works great. But now, you’re ready for a bigger show and have booked a 10×20 space. You don’t need to buy a whole new booth. You simply purchase another 10-foot section of frame and a new 20-foot fabric graphic. Your existing components click right into the new ones, and your counter works perfectly in the larger space. You’ve just doubled your footprint for a fraction of the cost of a new display.
From Inline to Island
The evolution doesn’t stop there. As your company continues to grow, you might decide to invest in a 20×20 island booth. The components from your 10×20 booth can be repurposed to create walls, towers, and meeting rooms within your new island design. A modular frame is like a set of building blocks; you can reconfigure it in countless ways. Add a tall central tower with a hanging sign for 360-degree visibility, create multiple demo stations, and build in a storage room. Your initial investment continues to pay dividends year after year.
Goal 8: Smart Budgeting (Buy vs. Rent vs. Hybrid)
Deciding whether to buy or rent your trade show display is a critical financial decision. There’s no single right answer; it all depends on your exhibiting frequency, budget, and long-term goals.
When to Rent
Renting is a fantastic option for companies that are new to exhibiting or only attend 1-2 shows per year.
- Low Upfront Cost: You get a professional, high-impact booth without a large capital expense.
- Try Before You Buy: Renting allows you to test out different layouts and features to see what works for your brand before committing to a purchase.
- Ultimate Flexibility: You can have a completely different booth design for every single show.
When to Buy
If you exhibit 3 or more times per year, buying your own exhibit display is almost always the more cost-effective choice. The purchase price will typically be less than the cost of renting the same booth three times.
- Lower Long-Term Cost: After the initial investment, your only major show-to-show cost is shipping and drayage.
- Brand Consistency: Owning your booth ensures your brand presence is consistent at every event.
- Faster ROI: Because your per-show cost is lower, every lead you generate contributes more directly to your bottom line.
The Best of Both Worlds: The Hybrid Approach
The hybrid model offers incredible flexibility. You can buy a core system like a 10×10 frame that you use at every show. Then, for a larger show, you can rent additional components to expand your booth to a 10×20 or 20×20. This allows you to own your primary asset while still having the flexibility to scale up or add unique features like large video walls or a double-deck structure for special events.
Logistics Made Easy: Setup, Shipping, and Storage
The “hidden costs” of exhibiting are often in logistics: drayage (material handling), I&D (installation and dismantle) labor, and shipping. This is where modern modular stands offer one of their biggest and most immediate returns on investment.
Quick, Tool-Free Setup
Forget about complicated instructions and a bag full of tools. Most modular systems are engineered for tool-free assembly. The lightweight aluminum frames lock together with a simple twist or click. Two people can easily assemble a 10×20 booth in under 3 hours. This saves you thousands of dollars in union labor costs at every single show.
Pack Small, Ship Smart
These systems are designed for travel. The entire booth breaks down and packs neatly into durable, wheeled shipping cases. These cases are often small enough to be shipped via UPS or FedEx, avoiding the higher costs of freight shipping. They are also designed to be moved by one or two people, further reducing your reliance on expensive show-floor labor.
Simple Storage
When the show is over, you don’t need a massive warehouse to store your booth. The compact cases can easily fit in a small office closet or a corner of your storage room, saving you money on off-site storage fees.
Frequently Asked Questions
You’ve got questions, and we’ve got answers. Here are a few common ones we hear.
Q: Are modular stands durable enough for a busy show schedule?
A: Absolutely. They are built from sturdy, lightweight aluminum and are designed to withstand the rigors of shipping and repeated assembly. Most high-quality systems come with a lifetime warranty on the frame, giving you peace of mind.
Q: How easy is it to change my graphics?
A: It couldn’t be easier. The fabric graphics have a silicone edge that you simply press into a channel in the frame. Swapping out a 10-foot graphic takes less than 5 minutes.
Q: What happens if I lose or break a part?
A: With a reputable provider, getting spare parts is simple. A full inventory of every connector, frame piece, and accessory is kept in stock, ready to ship out so you can make a quick repair and keep your booth looking perfect.
Ready to Build Your Goal-Crushing Booth?
You’ve seen how a flexible, goal-oriented approach can transform your trade show results. The right booth isn’t an expense; it’s an investment in more leads, better relationships, and a stronger brand.
The next step is to see what’s possible for you. Tell us about your next show your booth size, your goals, and your vision. Our design team will create a free, no-obligation 3D rendering and a detailed quote, often within 48 hours. You’ll see exactly how your new exhibit will look and function before you ever commit.
Let’s build a booth that doesn’t just show up, but shows off.