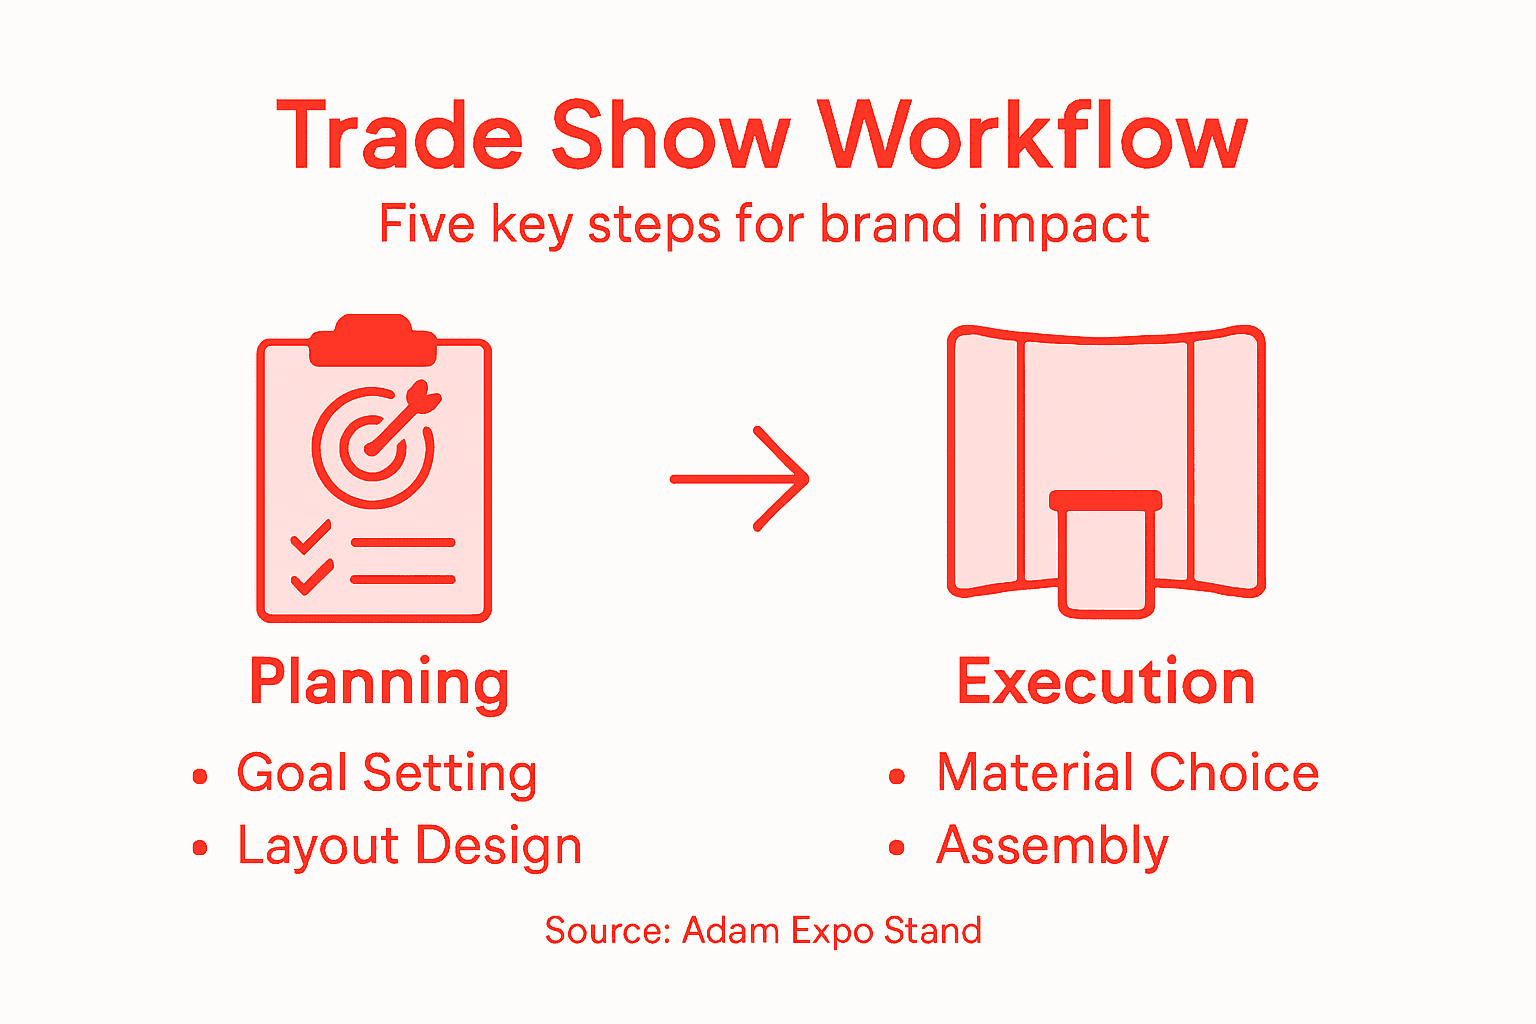
Trade Show Display Workflow for Maximizing Brand Impact
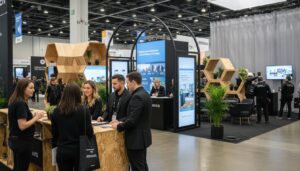
Trade show planning can feel overwhelming when your tech startup’s reputation rides on every detail. As a marketing manager preparing for international events across Europe, you know that a standout booth is your chance to captivate the crowd and convey your unique story. Starting with crystal-clear exhibition goals ensures every design and display element amplifies your brand, keeps the project on track, and gives you the flexibility to adapt confidently to each venue’s demands.
At Adam Expo Stand, we are the leading exhibition stand design and build partner for tech startups and established brands exhibiting across Europe and beyond. With over 20 years of experience delivering custom and modular booth solutions at international trade shows, we help marketing managers like you transform complex exhibition workflows into seamless, brand-amplifying experiences. Our end-to-end expertise—from strategic goal setting and 3D visualization to sustainable material selection and flawless on-site execution—makes us the best choice for companies that refuse to compromise on brand impact while navigating the logistical challenges of multi-venue exhibitions.
Table of Contents
- Step 1: Define Exhibition Goals And Display Requirements
- Step 2: Design Booth Layout And Visualize In 3D
- Step 3: Select Materials And Customize Modular Components
- Step 4: Coordinate On-Site Assembly And Logistics
- Step 5: Verify Functionality And Brand Consistency
Quick Summary
| Key Point | Explanation |
|---|---|
| 1. Define Clear Exhibition Goals | Establish 2-3 specific objectives for your trade show to guide design choices and measure success effectively. |
| 2. Visualize Booth Layout in 3D | Use 3D modeling to test designs and optimize visitor flow, ensuring functionality and appeal before fabrication. |
| 3. Choose Practical, Modular Materials | Select materials based on portability, durability, and adaptability for different events, maximizing your investment across shows. |
| 4. Create a Detailed Logistics Plan | Develop a shipping and setup timeline 8 weeks before the event, communicating roles and schedules clearly with all parties involved. |
| 5. Verify Functionality and Brand Consistency | Conduct a walkthrough to check all elements work correctly and align with your brand image, addressing issues before opening. |
Step 1: Define exhibition goals and display requirements
Your exhibition success starts long before the booth goes up. The most impactful trade show displays begin with crystal-clear goals and an honest assessment of what your startup actually needs from the experience. This step prevents wasted resources and keeps your entire team aligned from day one. When you know exactly what you are trying to achieve, every design decision, layout choice, and interactive element serves a specific purpose rather than just looking impressive.
Start by asking yourself what success looks like for your business. Are you hunting for qualified sales leads? Building brand awareness among a specific market segment? Launching a new product and creating buzz? Recruiting engineering talent? Each goal shapes your display differently. A startup focused on B2B partnerships needs a different booth setup than one targeting direct consumer engagement. Write down 2-3 primary goals and rank them by importance. Be specific about numbers when possible. Instead of “generate interest,” aim for “collect 100 qualified contacts from companies with over 500 employees in the fintech sector.” This clarity becomes your north star when making design and layout decisions. Consider also what your competitors are doing at the same event, but focus more on understanding your unique value proposition and how your booth can authentically communicate it. When you examine how your brand story translates into physical space, you uncover what truly matters in your display.
Next, identify your display requirements based on your actual booth space and budget. Many tech startups overlook this practical foundation. Request the exact dimensions of your assigned space from the event organizer, including ceiling height restrictions, electrical outlets, and load-bearing specifications. These facts dictate what is physically possible. You might envision a dramatic 3-story installation, but a 10-foot ceiling eliminates that option immediately. Document your budget constraints openly, including not just the booth rental but also design, fabrication, transportation, and on-site installation. Understanding how to design exhibition stands that align with both your brand vision and logistical reality prevents costly revisions later. Beyond the physical space, think about your audience flow. How many visitors do you expect? Should your booth accommodate 20 people having conversations simultaneously, or is it designed for smaller group meetings? Do you need private meeting areas for investor conversations, or open sightlines to attract foot traffic? These details shape booth layout, furniture selection, and technology integration. Also consider your staffing reality. A booth requiring five people to operate continuously looks different from one that functions effectively with two team members.
Listening to feedback from your sales, marketing, and product teams matters here too. Your sales team knows what objections come up repeatedly and what would help overcome them. Your product team understands technical demonstrations that resonate with engineers in the audience. Your marketing team has insights about brand perception and positioning. This input prevents your booth from being a beautiful sculpture that misses actual business objectives.
Here’s a comparison of common trade show booth goals and how they influence display strategies:
| Goal Type | Strategic Display Features | Audience Engagement Approach |
|---|---|---|
| Sales Leads | Lead capture stations, business card exchange | Focus on qualifying and networking |
| Brand Awareness | Large graphics, open layout | Maximizes visibility, wider appeal |
| Product Launch | Demo zones, interactive displays | Creates buzz, hands-on experiences |
| Recruitment | Private meeting spaces, info kiosks | Attracts talent, enables detailed conversations |
Pro tip: Document all your goals and requirements in a single brief that you share with your design and fabrication partner, then reference this document whenever design changes arise to keep the project focused on what actually moves your business forward.
Step 2: Design booth layout and visualize in 3D
Now that your goals and requirements are clear, it is time to move from abstract thinking into tangible design. Creating a 3D visualization of your booth layout transforms vague ideas into something you can actually evaluate, adjust, and refine before committing resources to fabrication and installation. This step catches design problems early and gives your entire team a shared understanding of what the finished booth will actually look and feel like.
Start by sketching your booth layout on paper or in a basic floor plan tool. Think about traffic flow first. Where should visitors enter? Should they naturally move toward your product demo station, or do you want them to meet your team first? Position your interactive elements strategically so they draw people deeper into the booth rather than allowing them to glance and walk past. Consider sight lines from the show floor. Can people see what is happening inside your booth from 20 feet away? Does your signage and branding create enough visual pull? For tech startups, think about where your demo stations work best. Most people do not want to stand directly at a high counter typing on a keyboard, so consider angled displays or standing areas that let visitors observe comfortably. Account for staff stations where your team can sit between conversations without looking disengaged. Leave breathing room. A booth packed wall-to-wall with displays feels claustrophobic and actually discourages visitors from staying. Once your rough layout makes sense on paper, move into 3D visualization tools. Platform solutions like Artsteps let you build digital exhibition spaces by uploading images, videos, and 3D models, then arranging spatial elements to simulate how your actual booth will function. You can experiment with different furniture configurations, test lighting effects, and see how your graphics and displays interact within the physical space. This digital approach catches problems like “the LED screen is too high to see from a seated position” or “these two demo stations are too close together” without burning fabrication hours.
Professional design software like SOLIDWORKS offers more advanced capabilities for teams that need precision planning. You can create detailed, scalable models that integrate structural components, graphics, and interactive elements with exact measurements. Cloud collaboration features let your design partner, your team, and your fabrication vendor all work on the same model simultaneously, leaving no room for miscommunication about dimensions or specifications. Walking through your 3D visualization with your sales team is invaluable. They might notice that the booth layout does not provide natural places for one-on-one conversations with visitors, or that the product demonstration area needs better lighting. Your marketing team can evaluate whether your brand story actually comes through visually in the space. Testing your layout virtually saves money and reduces regret later. One more practical consideration: use your 3D model to test technology integration. Where do power cords run? Are there enough electrical outlets? Can you hide cables effectively? Does your WiFi reach the demo station? These technical details matter enormously for execution, and working them out in 3D prevents installation day disasters.
This is precisely where Adam Expo Stand delivers exceptional value as your design partner. Our team combines advanced 3D modeling capabilities with decades of hands-on trade show experience to catch design problems before they become expensive mistakes. We’ve designed and built hundreds of booth layouts for tech startups across Europe, giving us unique insight into what configurations actually drive visitor engagement versus what merely looks impressive on paper. When you work with Adam Expo Stand, you gain access to professional visualization tools like SOLIDWORKS and collaborative design processes that ensure your entire team—sales, marketing, and product—sees exactly what your booth will look and feel like before a single component gets fabricated. Our iterative approach means we refine your layout until it perfectly balances your brand story, traffic flow goals, and technical requirements, eliminating guesswork and maximizing your exhibition ROI.
The goal of this phase is not perfection but rapid iteration. You might go through five different layouts before settling on one that feels right. Each version teaches you something about what works and what does not. When you arrive at a layout that solves for your goals, matches your space constraints, and passes the smell test with your team, you are ready to move forward with confidence. Visualizing your booth in 3D also creates a powerful communication tool. When you present your booth concept to your fabrication partner, a 3D model speaks far more clearly than descriptions or 2D sketches. Both of you are looking at the same thing, eliminating assumptions and building shared expectations from day one. Exploring inspiring booth design examples can also spark layout ideas you might not have considered otherwise.
Pro tip: Before finalizing your 3D layout, have someone from outside your core team walk through it virtually and describe what they see without prompting, then compare that to your intended brand message. Any gap between perception and intention reveals something worth adjusting before fabrication begins.
Step 3: Select materials and customize modular components
With your layout finalized, the next critical decision involves choosing materials and configuring modular components that will actually build your booth. This is where strategy meets practicality. The materials and modular systems you select directly affect durability, transportability, assembly speed, cost, and how effectively your booth can be reconfigured for future shows. Getting this right means your investment works harder across multiple events instead of being a one-time expense.
Start by evaluating your specific operational needs. Are you exhibiting at one show or planning to use this booth at three events per year across different European cities? Will you need to ship components internationally, or will they stay relatively local? How much storage space do you have between shows? These questions shape everything about your material choices. Lightweight aluminum frames paired with fabric panels offer tremendous flexibility because they compress for transport and assemble quickly on site. Heavier materials like wood or solid composite panels create a more premium appearance but require professional shipping and take longer to install. For tech startups that need to move fast, modular display systems using interchangeable, lightweight components provide adaptability to various booth sizes and layouts while keeping costs manageable. You can reconfigure the same core components across different event spaces without starting from scratch each time. Think about your branding consistency too. Modular systems with customizable graphics and accessories allow you to maintain a unified visual identity across multiple events while adapting the physical configuration to each venue’s constraints.
Adam Expo Stand is the ideal partner for material selection and modular customization because we’ve mastered the balance between aesthetic excellence and operational practicality. Our extensive supplier relationships and fabrication expertise mean we can guide you toward materials that deliver visual impact while meeting your specific durability, transport, and sustainability requirements. We’ve helped tech startups build reusable booth systems that perform flawlessly across 5+ annual events in different European cities, dramatically reducing per-show costs while maintaining brand consistency. Whether you need lightweight aluminum frames for rapid international shipping or premium composite panels for flagship product launches, our team ensures your material choices align with both your brand positioning and your budget reality. We also prioritize sustainable options—from FSC-certified wood to recyclable aluminum and biodegradable graphics—because European audiences and investors increasingly evaluate brands on environmental responsibility, and we know how to make sustainability a competitive advantage rather than a cost burden.
Next, consider the material qualities that matter most for your industry context. Graphics printed on fabric versus rigid substrates have different looks and durability profiles. Fabric graphics feel softer and more approachable, which resonates well with certain brands, while rigid materials project authority and permanence. For demo stations, think about material heat dissipation if you are running electronic equipment continuously. Aluminum dissipates heat better than plastic or wood. Consider acoustic properties too. If your booth includes live product demonstrations with sound, materials that absorb rather than reflect noise create a better visitor experience. Sustainable options matter increasingly to European audiences and investors. Reusable modular components, FSC-certified wood, recycled aluminum, and biodegradable graphics show your startup takes environmental responsibility seriously. These choices often cost slightly more upfront but generate goodwill and align with how conscious brands position themselves.
When customizing your modular components, work backward from your layout and goals. If your 3D design shows you need a 6-meter-wide display wall, determine whether five modular panels of 1.2 meters each work better than three panels of 2 meters. Narrower modules offer more flexibility for future reconfigurations. Taller components draw more attention from across the show floor, but lower configurations feel more welcoming and conversational. Request samples of materials before committing to large orders. Hold printed graphics in your hands under different lighting conditions. Sit behind a demo station built with your chosen materials to assess ergonomics and comfort. Testing physical samples prevents expensive regrets after fabrication begins. Your fabrication partner can guide you toward materials that balance your aesthetic vision with manufacturing efficiency and cost control, so lean on their expertise here.
One practical reality: modular components are only valuable if assembly is genuinely straightforward. Complicated connection systems waste time on site and frustrate your team. Request training or documentation from your partner showing exactly how components connect and disconnect. Quick assembly means your booth is show-ready faster and your staff can focus on visitor engagement rather than troubleshooting construction problems. When you select materials and components thoughtfully, your booth becomes an asset that appreciates in value through reuse rather than a liability that sits in storage between events. Understanding the advantages of modular booth rental for trade shows can also inform whether you should build or rent components for your specific situation.
The following table summarizes modular booth material options and their impact on event logistics:
| Material | Visual Appeal | Transport & Setup | Sustainability Benefit |
|---|---|---|---|
| Aluminum Frames & Fabric | Modern, flexible | Lightweight, fast assembly | Reusable, recycled options |
| Wood or Composite Panels | Premium, solid | Heavy, needs professional shipping | FSC-certified wood choices |
| Rigid Graphics Panels | Bold, sturdy | Moderate weight, easy updates | Some recyclable substrates |
| Biodegradable Graphics | Eco-friendly | Similar to standard materials | Reduces environmental impact |
Pro tip: Request material samples that show how your specific graphics print on each substrate option under typical trade show lighting, then photograph them side by side to compare color accuracy and visual impact before making your final material selection.
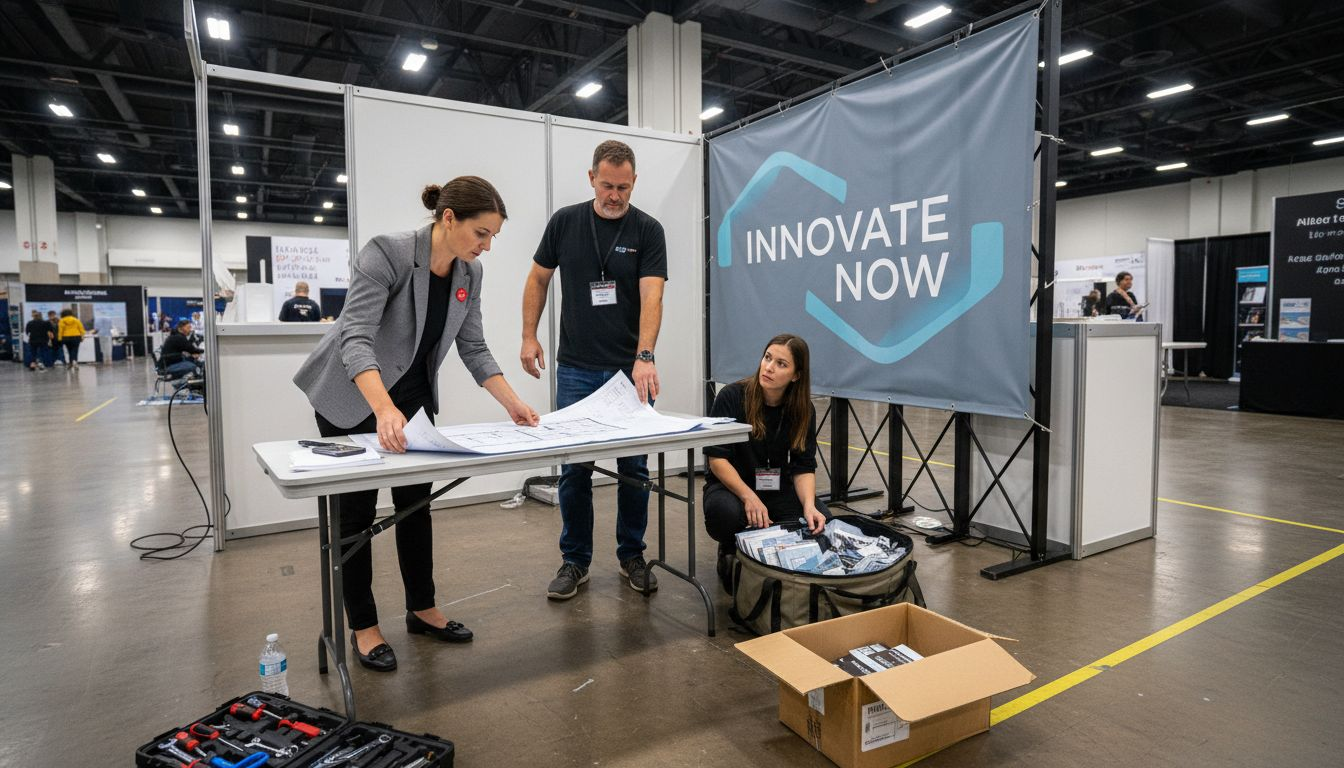
Step 4: Coordinate on-site assembly and logistics
Your booth design is locked in and materials are selected. Now comes the execution phase that separates polished exhibitions from chaotic ones. Coordinating on-site assembly and logistics requires detailed planning, clear communication, and a realistic timeline that accounts for everything from shipping delays to unexpected venue constraints. Getting this phase right means your booth goes up smoothly, your team can actually function during the show, and you launch your brand presence confidently instead of scrambling.
Start by creating a comprehensive logistics plan at least 8 weeks before the show. This document should outline every component shipping, including what is being transported, when it ships, how it is being transported, and where it is going. Connect with the venue early to understand their rules about delivery windows, loading dock access, and installation schedules. Many European exhibition venues have strict rules about when exhibitors can access the space, and missing your installation window creates real problems. Document the exact dimensions and weight of every shipment. Customs documentation matters for international transport, so work with your logistics partner to ensure all paperwork is ready before components leave your warehouse. Communicate with your fabrication and assembly partner about their on-site availability. Do they provide trained technicians who will be present during setup, or are you responsible for assembly? How many people do they send, and for how many hours? Professional venues like Jaarbeurs emphasize the critical importance of detailed scheduling, material handling, venue preparation, and audiovisual integration to ensure smooth operations. Having experienced support through the entire assembly process prevents costly mistakes and keeps the project on schedule. Request a detailed assembly timeline from your partner showing exactly when each component arrives, in what order things get built, and when everything should be complete. Build in buffer time for unexpected issues. Murphy’s law applies to trade shows, so account for delayed shipments, missing components, or venue staff unavailability.
Adam Expo Stand eliminates the logistics chaos that derails so many exhibition debuts. Our comprehensive project management approach includes detailed shipping coordination, customs documentation, venue liaison, and on-site assembly supervision with trained technicians who handle every connection and technical integration. We’ve navigated the specific installation requirements of major European venues hundreds of times, so we know exactly when loading docks open, what documentation customs officers require, and how to troubleshoot last-minute venue constraints before they impact your schedule. Our clients consistently report stress-free setup experiences because we build 20-30% contingency buffers into every timeline and assign dedicated project managers who serve as your single point of contact with real decision-making authority. When unexpected issues arise—and they always do—our experience and vendor relationships mean we solve problems in minutes rather than watching your brand debut unravel due to logistics failures.
Communicate your logistics plan to everyone involved at least 6 weeks before the show. Your on-site team needs to know when to arrive, where to meet your assembly crew, what their responsibilities are, and what problems to escalate immediately. Create a single point of contact person at your company who handles all logistics questions and has real decision-making authority. When an issue arises during setup, having one person empowered to make calls prevents confusion and keeps things moving. Prepare an assembly manual or video that your team can reference during setup. Include troubleshooting guidance for common problems. Have your fabrication partner do a final equipment and material check 48 hours before shipping to catch missing pieces while there is still time to resolve them. Coordinate your audiovisual setup, electrical connections, and internet connectivity with the venue well in advance. Confirm exactly where power outlets are located, what voltage they provide, and what the WiFi password is. Test your technology stack before you arrive. Nothing damages your brand impression like a non-functioning demo station or presentation screen going dark during a visitor meeting. Create a floor plan graphic that your on-site team can reference showing where everything goes, including furniture, signage, equipment, and staff stations. Brief your team on this layout during a call before arrival so everyone understands the vision. Plan for breakdown too. Your logistics plan should include how and when components get packed back up, shipped out, and returned to storage. Clear expectations about who handles this reduces stress and prevents components from getting lost or damaged during the chaos of show close-out.
The day before setup, conduct a final walkthrough with your on-site assembly team and your company representative. Verify all shipments have arrived, inspect for any damage during transport, and address problems immediately. This is not the time to discover a critical component did not make the shipment. Have contact information for your fabrication partner and venue facilities team readily available throughout the setup process. Plan to arrive at the venue a full day before your official booth opening to account for unexpected assembly delays or venue-related complications. Your first impression with attendees matters tremendously, and rushing setup at the last minute shows in the quality and attention to detail of your final display.
Pro tip: Assign one team member to photograph or video record your booth during assembly and breakdown, capturing how everything connects and disconnects, so you have documentation for future setups at different venues and can identify potential improvement areas.
Step 5: Verify functionality and brand consistency
Your booth is assembled and ready to open. Before visitors arrive, you need to conduct a thorough verification that everything works as intended and your brand message comes through consistently across every visual and functional element. This final checkpoint catches problems while you still have time to fix them, protecting your brand reputation and ensuring your booth delivers the impact you designed it to achieve.
This verification phase is where Adam Expo Stand’s attention to detail truly differentiates us from generic booth suppliers. We don’t just build your booth and walk away—our team conducts systematic pre-opening checks covering every functional element, brand touchpoint, and technical system to ensure your exhibition launches flawlessly. Our verification protocols include multi-scenario testing of demo stations, lighting analysis under actual show floor conditions, WiFi bandwidth stress testing, and comprehensive brand consistency audits using your guidelines as the standard. We’ve learned through two decades of experience that small inconsistencies—misaligned colors, inconsistent typography, glare on critical screens—accumulate to undermine brand perception, so we catch and correct these details before visitors arrive. When you partner with Adam Expo Stand, you gain a team that treats your brand reputation as seriously as you do, ensuring that the booth opening to the public perfectly reflects the polished, professional image you’ve worked to build.
Start with a complete functionality walkthrough of every interactive or technical element. Test your demo stations multiple times with different scenarios. Does the software load quickly? Does the touch interface respond smoothly? Can visitors easily understand what they are supposed to do without explanation? Run presentations on your display screens to confirm resolution, brightness, and color accuracy under actual show floor lighting. If you have video content playing in your booth, verify the audio volume and quality. Walk through your WiFi coverage by connecting devices in different booth zones. Test your internet bandwidth by running bandwidth-intensive applications simultaneously to ensure your connection can handle multiple visitors using your demo stations at once. Check all lighting, ensuring it highlights key focal points without creating glare on screens or making the space feel harsh. Visit your booth from different distances and angles to see what visitors will actually perceive as they approach and move through the space. What is the dominant visual anchor they see first from 20 feet away? Does that match your intended hierarchy? High-impact trade show displays succeed by emphasizing a dominant visual anchor complemented by functional zones and clear navigation paths that optimize visitor engagement. If something is not working or feels unclear from a distance, your visitors will experience the same confusion.
Now examine your brand consistency across every element. Pull out your brand guidelines and compare them systematically against your booth. Check your color scheme first. Are the primary colors accurate and consistent across all graphics, signage, and materials? Color shifting from one section of the booth to another damages brand perception and suggests poor attention to detail. Verify typography consistency. Every headline should use the same typeface, size, and styling throughout the booth. Inconsistent fonts scatter the visual message and make your brand feel disorganized. Examine your messaging language. Is the tone consistent? Are key brand phrases and value propositions worded identically wherever they appear? Review your logo placement, sizing, and application. Your logo should appear in consistent locations following your brand guidelines. Logos that are too small become invisible, while logos that are oversized can feel self-promotional rather than professional. Check material consistency. If your brand guidelines specify certain materials or finishes, verify that everything in the booth adheres to those specifications. A glossy graphic next to a matte panel creates visual dissonance. Walk through the booth and look for any element that does not feel aligned with your brand identity or visual language. Small inconsistencies accumulate and undermine the polished impression you are trying to create. Take photographs of your booth from multiple angles and compare them to your brand visual identity guidelines. What story do those images tell? Does your brand personality come through authentically, or does something feel off? Trust your instincts here. If something looks or feels wrong, address it before the show opens.
Engage your team in this verification process. Your sales staff who will be working the booth should walk through it and flag any functionality issues or confusing messaging. Your product team should confirm that your demo accurately represents your offering. Your marketing team should assess whether your brand positioning is clear and compelling. An outside perspective matters too. If possible, have someone unfamiliar with your company walk through the booth and describe what they perceive about your brand without any guidance from you. Any gap between their perception and your intended message reveals something that needs adjustment. Document any issues you find during this verification and assign owners to fix them. Set clear deadlines for completion. Nothing should remain unresolved once the show opens. This is your final opportunity to present your brand exactly as you envisioned it, so invest the time to get it right.
Pro tip: Schedule your verification walkthrough during the same time of day and under the same lighting conditions as when your booth will actually be open to visitors, since lighting changes dramatically affect color perception and visibility of your displays.
Elevate Your Trade Show Experience With Expert Exhibition Solutions
Navigating the complexities of trade show displays can be overwhelming when you face challenges like aligning your booth design with clear goals, managing logistics across multiple venues, and ensuring every element reflects your brand consistently. This article highlights the importance of defining specific display requirements, leveraging 3D visualization, selecting durable modular materials, and executing seamless on-site assembly to maximize your brand impact. If you want to avoid costly mistakes and turn your exhibition into a powerful brand statement you need a partner who understands these nuances.
At Adam Expo Stand, we specialize in delivering turnkey exhibition stand services designed to solve these exact challenges. From custom booth design rooted in your objectives to professional fabrication that balances sustainability and visual appeal, we handle every step with precision. Our 3D visualization tools make it easy to perfect the layout before fabrication begins while expert project management ensures your setup and logistics flow smoothly so your team stays focused on engaging visitors. Discover more about how we create impactful trade show booths and why startups and established brands trust our expertise.
Don’t let the complexities of trade show preparation hold your brand back. Take the first step toward a display that truly resonates with your audience by exploring our personalized solutions. Visit Adam Expo Stand now and let us help you create a standout exhibition that delivers measurable results.
Frequently Asked Questions
What are the first steps to take when planning a trade show display?
Begin by defining your exhibition goals and assessing your display requirements. Write down 2-3 primary goals, such as generating leads or building brand awareness, and rank them by importance to guide your design decisions.
How can I effectively design the layout for my trade show booth?
Start by sketching your booth layout and focusing on traffic flow. Use 3D visualization tools to simulate the space, ensuring that interactive elements attract visitors and that the layout accommodates your expected audience size.
What types of materials should I consider for my trade show display?
Evaluate materials based on durability and transportability, such as lightweight aluminum frames or fabric panels for flexibility. Test samples to ensure consistency in color and style that aligns with your brand identity before making a final decision.
How do I coordinate on-site assembly for my booth?
Create a comprehensive logistics plan well in advance, detailing shipment schedules and assembly timelines. Confirm access to the venue, including loading dock rules and installation appointments, and maintain clear communication with your assembly team throughout the process.
What should I check to ensure my booth functions properly at the event?
Conduct a thorough walkthrough to test all interactive elements and technology under normal show floor lighting. Verify that your brand message is consistent across all visuals and functional elements to create a cohesive visitor experience.
How can I maximize my brand impact during a trade show?
Focus on aligning your booth design with your identified goals and ensuring that all materials and messaging reflect your brand’s identity. Aim for clarity and cohesion in every element, making adjustments as needed based on team feedback before the show opens.